
 2025/09/30
In the world of scientific imaging, precision and stability are everything. Whether you're conducting time-lapse microscopy, capturing spectral data, or measuring fluorescence in biological samples, how you mount your camera is just as critical as the camera itself. A shaky or misaligned setup can lead to inaccurate results, wasted time, and even equipment damage.
This guide walks you through the essentials of camera mounts for scientific cameras—what they are, which types are commonly used, how to choose the right one, and best practices for optimal performance.
What Are Scientific Camera Mounts?
A camera mount is the mechanical interface between a camera and its support system, such as a tripod, optical bench, microscope, or fixed installation. In scientific contexts, mounts must do more than just hold the camera—they must maintain exact alignment, minimize vibration, and allow fine adjustments.
Unlike consumer photography mounts, scientific mounts are often modular and designed to integrate seamlessly with lab environments and optical systems. They are compatible with a wide range of imaging devices, including scientific cameras, sCMOS cameras, and CMOS cameras, all of which are used in applications that demand high-resolution, low-noise image capture.
Common Types of Camera Mounts Used in Scientific Imaging
Scientific imaging setups vary widely across disciplines, so there’s no one-size-fits-all mount. Here are the most commonly used types:
Tripod and Desktop Stands
Tripods are portable, adjustable, and ideal for flexible, temporary setups. Though more commonly seen in photography, lab-grade tripods with fine-tuned adjustment heads can be suitable for less vibration-sensitive imaging, such as preliminary sample observation or training environments.
Best for:
● Educational labs
● Field research
● Quick setup for demos
|
|
|
|
 |
|
 |
Post and Rod Mounts
These are staples in laboratories and optical bench setups. Post mounts allow vertical and horizontal adjustments using support rods, clamps, and translation stages. Their modularity makes them ideal for integrating with breadboards and other optical components.
Best for:
● Microscope-mounted cameras
● Adjustable lab setups
● Imaging systems requiring precise alignment
Optical Rail Systems
Optical rails enable the linear positioning of cameras and optics with high accuracy. They're often used in laser experiments, spectroscopy, and photonics, where maintaining precise distances and alignment is essential.
Best for:
● Beamline alignment
● Custom spectroscopy setups
● Multi-component imaging systems
|
|
|
|
|
|
|
Wall, Ceiling, and Custom Mounts
For fixed installations such as industrial inspection, cleanroom monitoring, or environmental imaging, custom mounts offer permanent, stable positioning. These mounts can be designed to accommodate environmental constraints like temperature, vibration, or contamination.
Best for:
● Machine vision systems
● Cleanroom and factory environments
● Continuous time-lapse or security monitoring
|
|
|
|
|
|
|
How to Choose the Right Camera Mount
Selecting the appropriate camera mount is essential for ensuring accurate alignment, stable imaging, and full sensor utilization. Your choice should be guided by the camera type, optical system, environmental conditions, and specific imaging application.
Camera and Optical Compatibility
The mount is the interface between your scientific camera and the rest of your optical setup—whether it’s a microscope, lens system, or rail assembly. It's not just a mechanical attachment point; it plays a role in maintaining optical alignment and determining how much of the sensor area can be used effectively.
Many modern scientific cameras offer multiple mounting options, such as C-mount, T-mount, or F-mount, which are chosen based on the connected device. This modularity allows flexibility when integrating with various optical instruments. However, older microscopes and legacy optical components may only offer a single mount type, typically the C-mount, which can limit compatibility and may require adapters.
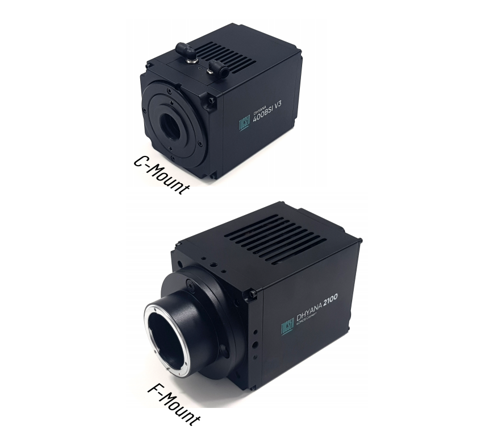
Top: Scientific camera with C-mount (Dhyana 400BSI V3 sCMOS Camera)
Bottom: Scientific camera with F-mount (Dhyana 2100)
Additionally, it's important to understand that different mounting options have different maximum supported fields of view. In some cases, a mount or optical system may not illuminate the entire sensor, even if your CMOS camera or sCMOS camera has a large imaging area. This can lead to vignetting or wasted resolution, especially with wide-format or large format camera sensors. Ensuring full sensor coverage is crucial for maximizing image quality.
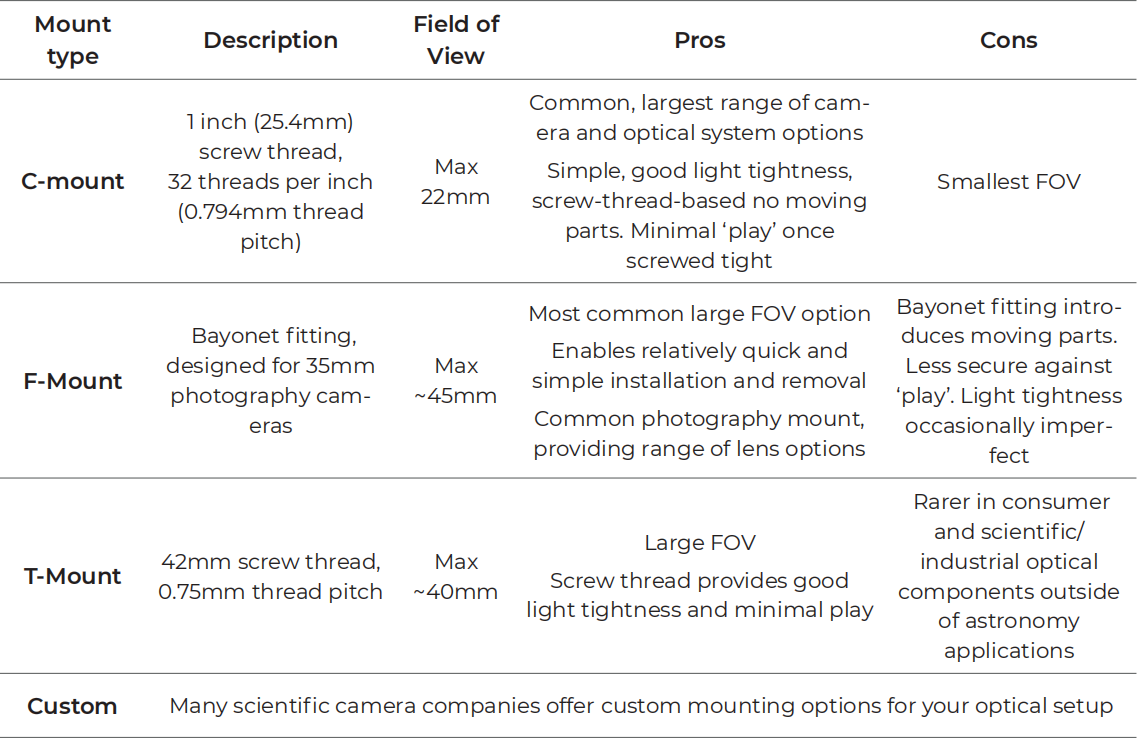
Table: Common scientific camera mounts, max size and pros/cons
Microscopes and Custom Optics
In microscopy, mounting compatibility varies widely. Modern research microscopes often provide modular ports that accept various camera mounts. This lets you select a mount that matches your camera’s interface. However, when working with custom optics or older microscopes, the fixed mount type may dictate which cameras can be used, or whether an adapter is necessary.
Adapters can be useful, especially when trying to attach a consumer-grade lens to a scientific imaging system. But use caution: adapters may alter the flange focal distance (the distance from the lens to the sensor), which can distort the image or affect focusing accuracy.
Imaging Application Requirements
The ideal mount also depends on what you're capturing:
● Microscopy imaging requires high precision and stability, often with fine XYZ translation for focus stacking or time-lapse.
● Machine vision systems demand rugged, fixed mounts that maintain alignment during extended operation.
● Astronomical or long-exposure imaging may need motorized or equatorial mounts that track objects over time.
Understanding your application's motion, resolution, and environmental sensitivity will guide your mount selection.
Vibration and Stability
Especially for high-resolution or long-exposure imaging, even tiny vibrations can degrade image quality. Look for mounts with vibration isolation features, such as rubber dampers, granite bases, or pneumatic isolators. For bench-top systems, optical tables with damping layers are highly recommended.
Also, consider the camera’s weight and heat output. Heavier cameras, such as HDMI cameras with built-in cooling, may require reinforced mounting systems to maintain positional accuracy.
Environmental Considerations
Will your system be used in a cleanroom, a temperature-controlled lab, or in the field?
● Cleanroom setups require materials like stainless steel or anodized aluminum to prevent contamination.
● Field applications demand portable, rugged mounts resistant to vibration and environmental changes.
● For precision setups, ensure the mount resists thermal expansion, which can subtly shift alignment over time.
Best Practices for Mounting Scientific Cameras
Once you've selected the right mount, follow these best practices to ensure optimal performance:
● Secure all joints and interfaces: Loose screws or brackets can introduce vibrations or misalignments.
● Use cable strain relief: Avoid hanging cables that can tug on the camera or shift its position.
● Align the optical path: Ensure your camera is centered and level relative to the objective lens or optical axis.
● Allow thermal stabilization: Let your system warm up if temperature changes can affect optical performance.
● Check periodically: Over time, vibration or handling may shift your setup. Routine checks can save you from unnoticed image drift.
Popular Camera Mounting Accessories
The right accessories can enhance your setup significantly. Here are some commonly used ones in scientific environments:
● Mounting Adapters: Convert between C-mount, T-mount, or custom thread sizes.
● Breadboards and Optical Tables: Provide stable, vibration-dampened platforms for entire systems.
● XYZ Translation Stages: Allow fine control over camera positioning.
● Lens Tubes and Extension Rings: Adjust working distances or insert filters and shutters.
● Vibration Isolators: Pneumatic or mechanical systems to reduce mechanical noise in sensitive setups.
These components are especially useful when working with a scmos camera that captures high-speed or low-light events requiring precise control and minimal motion.
Recommended Mounting Solutions for Specific Use Cases
To help match your needs more directly, here are some example setups:
Microscopy Imaging
Use a post or rail mount attached to an XYZ translation stage. Combine with lens adapters and vibration isolation feet for optimal stability.
Astronomy or Astrophotography
A motorized equatorial mount with tracking capability is essential for long exposures. Additional counterweights may be required for larger imaging systems.
Industrial Inspection
Wall or ceiling-mounted brackets with adjustable joints allow consistent alignment. Pair with cable management systems to avoid mechanical interference.
Spectroscopy and Photonics
Rails and cage systems provide precise component positioning. Combine with isolators and mechanical shutters for time-gated experiments.
Conclusion
Choosing the right camera mount for your scientific imaging setup isn’t just a matter of convenience—it’s essential for accuracy, repeatability, and image quality. The mount determines whether your camera can maintain the required positioning under demanding experimental conditions.
Whether you're using a scientific camera for high-resolution microscopy, an sCMOS camera for low-light fluorescence imaging, or a CMOS camera for high-speed capture, your mounting solution plays a foundational role.
Explore our range of mounts, adapters, and accessories to build a setup tailored to your exact needs. Reliable performance starts with a solid foundation—literally.
FAQs
What is the difference between C-mount, T-mount, and F-mount?
C-mount uses a 1-inch threaded interface and is commonly found in older microscopes and compact setups.
T-mount has a wider 42mm thread and supports larger sensors with minimal optical distortion.
F-mount is a bayonet-style connector designed for 35mm lenses and offers fast attachment but may introduce mechanical "play" during precision alignment.
For more, refer to our mount type comparison table in the article.
Why doesn’t my camera use the full sensor area?
Some mounts or optical systems have a limited field of view. Even if your camera has a large sensor (e.g., in a CMOS or sCMOS camera), the attached lens or microscope may not fully illuminate it, leading to vignetting or unused pixels. Choose a mount and optical system rated for your sensor size.
How do I reduce vibration in a high-resolution setup?
Use vibration isolation accessories like rubber dampers, pneumatic isolation tables, or granite bases. Mounts should be rigid, with all components firmly secured. Cable strain relief and thermal stabilization also help maintain alignment.
Tucsen Photonics Co., Ltd. All rights reserved. When citing, please acknowledge the source: www.tucsen.com


